Showing posts with label PC Tricks. Show all posts

Sunday, October 2, 2011

Test your Computer RAM with Windows Memory Diagnostic


Windows Memory Diagnostic is a free solution to detect whether your RAM is faulty or not.The Windows Memory Diagnostic tests the random access memory (RAM) on your computer for errors. The diagnostic includes a comprehensive set of memory tests.


If you are experiencing problems while running Windows, you can use the diagnostics to determine if the problems are caused by faulty hardware such as RAM or system memory on the motherboard.
To run Windows Memory Diagnostic, you must restart the computer by giving the boot floppy or CD-ROM on which you installed Windows Memory Diagnostic.The program is loaded and will start the first test after the first test is complete, Windows Memory Diagnostic will begin a second test and the test sequence will continue until you cancel and exit the program.

Download Windows Memory Diagnostic

Tuesday, September 27, 2011

How to Disable Autorun In Windows 7 and XP


The autorun feature of Windows OS can take your computer to be infected by viruses and other malicious programs. Therefore, for security reasons, it is recommended to disable it. To disable this feature a small utility has been developed called Windows 7 Autorun Disabler.

Its a small utility that gives users of Windows 7 a very simple way to disable the autorun feature for CDs/DVDs and flash drives.This program provides options to disable automatic execution of removable media drives, CD / DVD , network drives, RAM disks and option to disable autorun for all drives.

Operating this utility is very simple. Just run the program and select the option you want. To restore the default setting, check Enable autorun function on Windows 7.


Monday, September 26, 2011

How To Disable Automatic Disk Check(CHKDSK) At Startup For Windows XP


Windows start up after a sudden shutdown leads to an annoying feature Check Disk. It automatically checks the entire drive for any infected files, this chkdsk can be disabled manually. Even if the checking is skipped, it would prompt again during the next windows boot up.

So here are the steps to disable automatic disk-check option:

1. Open command prompt and type following and press enter
                             chkntfs/x c:
This will disable the disk checking option for drive c

2. Similarly for other drives you can type
                             chkntfs/x c: d:                          
This will disable checking d: drive

Saturday, September 24, 2011

Restore the Windows Default Settings Using RefreshPC


Some time my friends ask me that My computer is getting slow day by day and getting lots of bug then in that. If you have the same problem then use RefreshPC. RefreshPC is a small utility that allows Free restore the default settings of Windows. This can fix many problems on your computer.

RefreshPC is easy to use and secure. When you run it you can create a restore point system, which can be useful for undoing changes made ​​by RefreshPC later if necessary.Then all you need do is click Refresh My Windows Settings. He will restore the default settings for essential services and system specific keys from the Windows registry and ultimately will make the cleaning of temporary folders and data stored in the Windows Prefetch.

Its Compatible with Windows XP, Windows Vista and Windows 7 (32 and 64 bit)

Size: 2.03Mb

Wednesday, September 21, 2011

Increase Your Computer Shutdown Speed Without any Software

Sometimes you might feel that your Windows 7 is taking so long time to shut down.Its the Problem with lots of users, I was also facing same problem.Here is easiest solution for it.

1. First create a new shortcut by clicking Right mouse button on desktop.


2.Now enter shutdown.exe -s -t 00 -f in "Type the location of the item" field and click next.


3. Now give that shortcut a name and click Finish. Here i have given shutdown.exe

4.Double click on shutdown.exe to shutdown your computer with less time.

Internet Dwonload Manager 6.07 Bulid 11 With Crack

 
New features in IDM 6.07 Build 11

  • Added video stream recognition for several new web players
  • Fixed a critical bug in 32bit and 64bit versions of Windows


How To Install The Crack for IDM 6.07 Build 11
  1. Download the IDM   6.07 Build 11 and Crack From below link.
  2. Install The IDM. But dont open it, close it if automatically starts.
  3. Extract the IDM.6.7.11.Crack.zip 
  4. Copy the Cracked IDMan.exe and Replace the original IDMan.exe from the place where its installed.
  5. Now open RUN-x86.REG (for 32 bit PC) and add the file to registry, 64 bit users use RUN-x64.REG
  6. Now open the IDMan.exe and your IDM is Cracked
DOWNLOAD : IDM 6.07 Build 11

Saturday, September 17, 2011

Uninstall Any Program Easily Using IObit Uninstaller v2.0


IObit Unistaller v2.0 is a small size software of just 1.2MB. The 1st I like about IObit Uninstaller 2.0 is this is a portable software so you don’t need to install a new program to uninstall another and its totally freely available

Some Important Features Of IObit Uninstaller v2.0

Large Programs
Not only “Large Programs” Uninstaller categorizes our programs into four more parts :
 
    Toolbars : Many consider these free toolbars coming with some programs as Crapware and Spyware! They will pile up inside our browser and silently watch what we are doing… I hate them!
    Recently Installed : Can’t remember what you installed right now? Then check this category…
    Rarely Used : You install some software but don’t actually use some of them right? For me, I formated my machine recently, so no rarely used apps for me. If you want to free some space on your disks, this might be the first place to start!
    Windows Updates : All the updates applied by Windows. Lets stay out of that territory unless you know what you are doing!

Powerful Scan


First of all, select the software you want to remove and click “Uninstall”. Now, the IObit Uninstaller v2.0 will run the default Uninstaller which comes with that software. After it does its job, IObit Uninstaller will scan your system for leftovers. It will scan both the registry and the files so that you can make sure that the junk software is gone for good! 

Forced Uninstall 
While Uninstalling, you might have recognized that there are some software in PC which does not come up in the Add/Remove Programs (Not even in the Uninstaller). Some of them don’t even have a default uninstaller! , there’s another option called “Forced Uninstall”. This Forced Uninstall option can be used to remove those spooky apps which don’t have any uninstallers. Just drag and drop the shortcut of that software (or a file related to it) into the Forced Uninstall window, then, it will detect the software you want to remove and do the job for you.

Batch Uninstall


Want to remove several apps in one shot? Tick the “Batch Uninstall” option at the top and tick the victims one by one before you hit “Uninstall”. Then, all of them will be uninstalled before it starts to scan for leftovers. 


DOWNLOAD IObit Uninstaller 2.0 (From Official Website)


Kaspersky Internet Security 2012 Free 60 Days License

Key Features In Kaspersky 2012 Internet Security
  • Combines our essential antivirus protection with premium Internet threat defense
  • Prevents hacker attacks with two-way firewall
  • Secures your identity while online banking & shopping
  • Checks instantly for file, application & website safety
  • Rolls back most harmful malware activity
  • Keeps your children safe & responsible with advanced parental controls


Kaspersky is offering 2 months trial license, just goto to this Promotional page http://usa.kaspersky.com/downloads/free-home-trials/internet-security-facebook60?CAMPAIGN=INT1673721 

Enter You name and Email Id  and download Kaspersky internet security 2012 with 2 months License.

ALSO SEE:Norton Antivirus 2012 and Norton 360 Free For 90 days

Friday, September 16, 2011

Extend Laptop Battery Life and Fix Power Consumption Problems

The real problems with Laptops and Notebooks is their Battery Life. Most of the Laptop batteries are failing to live the duration specified by the manufacturers. Actually manufacturers are not responsible for these failures because some laptops backup time is very good. The reason for poor battery life is the Laptop settings ( timeout and sleep settings, display settings, and screensavers)

Microsoft is now is providing Windows users with a “Fix It” download via its Microsoft Support website, designed to make their laptop batteries live longer. The tool works best for Windows 7 laptops and notebooks, but also for computers running Windows Vista and XP.
 

How to Extend Laptop Battery Life ?

Download the MicrosoftFixit.power.Run.exe here and launch it on their Windows laptop. (Click “Run Now” to download the file)


What “Fix it” Fixes :
  •     Period of time before the computer goes to sleep is set too long
  •     Screen saver is used instead of setting the computer to enter sleep mode
  •     Display brightness is set too high
  •     Power plan is not set to the most efficient power plan
  •     Wireless adapter in not optimized for power saving
  •     Minimum processor state is set too high

Thursday, September 15, 2011

Panda Antivirus Pro 2012 Free License For 6 Months


New Improved Features In Panda Antivirus Pro 2012
  • Protection against all types of viruses and threats
  • Improved Personal Firewall
  • Panda Safe Browser for browsing Risky websites
  • Multimedia/Gaming Mode
  • Virtual Keyboard Support for Entering Passwords 
  • Clean all types of malware from your computer if you cannot start Windows. 
  • Panda USB Vaccine: which protect Infections from USB
  • Live up-to-the-minute updates
  • Home Network Manager
  • 24x7 Tech Support
Steps For Downloading Panda Antivirus Pro 2012 with free 6 months license 

  1. Login To your Facebook account.
  2. Go to http://www.facebook.com/PandaUSA Promotion Page.
  3. Click the Like button On top of that Page. The Page will be Refreshed after clicking Like button.
  4. Now Click on image(which similar to above image) to start Downloading Panda Antivirus Pro 2012 with 6 months License.
  5. Install The Panda Antivirus Pro 2012
  6. After installation you will see a Activation Wizard (See Above Image )
  7. Select "Try Free For 180 days" and click Next
  8. Then you will be asked to enter Your Email ID, enter it and click on next
  9. Now the Activation window will be opened and your activation will be completed.( See Image)
 Install the Downloaded Panda Antivirus pro 2012 and Use it free for 6 months legally, If you have any problem in Downloading this Antivirus then contact me.


Monday, September 12, 2011

Repair Any Damaged Files by Using File Repair for Windows


File Repair software is a powerful tool to repair your corrupted files. It scans the damaged file and extracts maximum data from it to a new usable file.

Using File Repair, you can repair:

    * corrupted Word documents (.doc, .docx, .docm, .rtf)
    * corrupted Excel spreadsheets (.xls, .xla, .xlsx)
    * corrupted Zip or RAR archives (.zip, .rar)
    * corrupted videos (.avi, .mp4, .mov, .flv, .wmv, .asf, .mpg)
    * corrupted JPEG, GIF, TIFF, BMP, PNG or RAW images (.jpg, .jpeg, .gif, .tiff, .bmp, .png)
    * corrupted PDF documents (.pdf)
    * corrupted Access databases (.mdb, .mde, .accdb, .accde)
    * corrupted PowerPoint presentations (.ppt, .pps, .pptx)
    * corrupted music (.mp3, .wav)
    
Using File Repair, you can repair files got corrupted due to:
    * unexpected power failure
    * network interruption
    * virus infection
    * network sharing
    * application errors

List of the errors to be fixed:
    * file is not in a recognizable format
    * unable to read file
    * file cannot be accessed
    * application cannot open the type of file represented by filename
    * out of memory errors, or low system resources errors  

Saturday, September 10, 2011

Download Free AVG Anti-Virus 2012


Major Improvements in AVG Anti-Virus 2012

    * Major change: Performance improvement that reduces itsr impact on your PC’s speed
    * Installer is half the size only when compare to 2011 edition
    * Faster installation
    * Hard drive use by Antivirus minimized by 45&
    * 20% less memory use
    * Loading time cut by 10%

Friday, September 9, 2011

Hack Microsoft Office Activation Alert : No Serial : No Patch

I will Show you how to avoid the Microsoft alert of activation. IF you have installed Microsoft office 2007/2010, with no serial key, than whenever you open any office software, you would be asked to enter activation key/serial key.

1. Install the Microsoft Office 2007/2010, with no key or serial.

2. Now, go to the C:\Program Files\Common Files\microsoft shared\OFFICE12\Office Setup Controller\Proof.en
3. Here you will find the file , named Proof.xml . Delete this file and close the folder.

4. Thats it.


How to Bypass Trial Period Of Softwares

Step 1: First thing to do is uninstall the application.

Step 2: Press Windows Key+R and  Type "Regedit".

Step 3: Go to HK Local Machine => Software => Your Software name. Delete the Key.

Do this for HK Current user if there exists a key of that software.

Step 4:
Go to run type "%temp%. Delete all files. Well they are just temporary files so it won't matter, it will only clean up ur pc little bit if not anything else.

Step 5: Go to Users => Username => Appdata Check all 3 directories that is "Local", "LocalLow", "Roaming" for your software entry. Delete that.

Step 6:
Reinstall application and enjoy the next trial. Just perform this everytime trial expires.

Tuesday, September 6, 2011

Solution to Fix External/Flash Drive Files Changed into Shortcuts

Some Viruses changes our files on our Flash Drive or External Hard Drive changed into Shortcuts. We can’t open the files from our Pen/Flash drives. Most of the people always suffers from this Virus problem and Their data is Lost. Here is tutorial to Get The lost Files Back.

Solution to Fix External/Flash Drive Files Changed into Shortcuts :


Step 1: If you are affected by Shortcut Viruses,Do not format your Flash or External Drive. If you format you can’t Recover it.

Step 2: Check your Flash Drive’s Drive Letter ( Example : G: or K:)

Step 3: Click on “Start” –>Run–>type “cmd” and click on OK

Step 4: If your Flash Drive Letter is H: then Type the below command in your “cmd” and Press “Enter”

attrib -h -r -s /s /d H: *.* (Check screen shot )

Note : Replace the letter H: with your flash drive letter


Step 5 :
Now your files will be visible.Make sure to keep the antivirus up-to-date to prevent viruses.

Sunday, September 4, 2011

How to Remove TOEUW.EXE Virus/Malware

TOEUW.EXE Causes The Following Problems
    * Writes to another Process Virtual Memory (Process Hijacking)
    * Executes a Process
    * This process creates other processes in your system.
    * Added as a Registry auto start to load Program on Boot up
    * Created as a process in your system
    * Executed as a Process

How to remove TOEUW.EXE


STEP 1. Kill/End the Toeuw.exe process on the Processes

STEP 2. Then download Combofix: http://download.bleepingcomputer.com/sUBs/ComboFix.exe

STEP 3. Create a folder in C: drive called ‘Combo’ and save the ComboFix.exe to that folder.
STEP 4. Close all other browser windows.

Note: Temporarily disable your anti-virus, real-time protection before performing a scan. They can interfere with combofix or remove some of its embedded files which may cause “unpredictable results”.
STEP 5. Go to start -> Run -> Type ‘cmd’(Without quotes) and click OK.
STEP 6. Type ‘cd\’ and Enter

STEP 7. Type ‘cd Combo’ and enter.
STEP 8. Type ‘ComboFix /snapshot’ then enter. It will run Combofix

Find and Recover Your Deleted History in Mozilla and IE

Follow these steps to
Recover History:

Go to Start -> Search Files Folders
All Files and Folders Make sure
you enable searching for hidden
files and searching in subfolders,
then search for files named
index.dat on the C drive. Once you find these files, you
can't just
open them up.

You will need a special reader to
view them, such as Super WinSpy. After a quick installation, you can
use it to view your index.dat files;
just type in the path to the file on
your hard drive, and watch your
deleted
history pop up!
Now no one can Hide History
from you.

Saturday, September 3, 2011

Adobe Photoshop CS5 Full Crack+Serial


Follow the below steps


Step 1: First you need to download and install
the Adobe Photoshop CS5 Extended
Trial from the Adobe website. (You're
going to need a free account.)
URL: http://www.adobe.com/cfusion/tdrc/
index.cfm?
product=photoshop&loc=en_us

Step 2: Then once the trial is installed, make
sure Photoshop is closed and navigate
to this directory: C:\WINDOWS\system32\drivers\etc\

Step 3: Download the zip archive given
below . Inside the archive there's a file
titled "hosts". Extract this file to your
desktop, then copy it to the above
directory given in step 2 (drivers\etc).
It should ask if you want to overwrite or replace the file. CLick "Yes" or "ok". If you have trouble overwriting, take
ownership of your original "hosts" file
then try replacing it again. OR Google
this: "how to take ownership of a file"


Step 4: Almost done. Open Photoshop. There
will be a window asking for a serial
number.

Use one of these:
1330-1036-2793-5476-2605-5729
1330-1193-9982-0310-7670-2199
1330-1470-0441-6829-3063-2553
Now You Are Done

Tuesday, August 30, 2011

Run Android OS On Your PC


Save $180: Asus U45JC-A2B 14" Core i3 Laptop - 4GB RAM, 320GB HD - Only $499 with Free Shipping

This Tutorial works on Windows 7, XP, Vista, Linux and Mac OS

STEP 1: You must need Java Development Kit (JDK) installed in your PC 1st. To download this, just visit here and download the “Java SE 7 -JDK”. (It also works with Java SE 6 -JDK)

STEP 2: Install The JDK o n your PC.

STEP 3: Then download the Android Emulator from the developer site. Make sure to select the correct version for your computer. Here I am using .exe files for windows.
DOWNLOAD Android Emulator 

STEP 4: After downloading has finished, run the installer_r11-windows.exe , Install it as usual.

Note: While installing, it might prompt that JDK not found (Even if you have installed it.) Don’t be panic. If you have already installed it, then just click back from the install wizard and again click next. This time it will find the JDK.

STEP 5: After finishing installation, run SDK Manager.exe from the installation directory. The SDK will check Google’s servers for available packages.
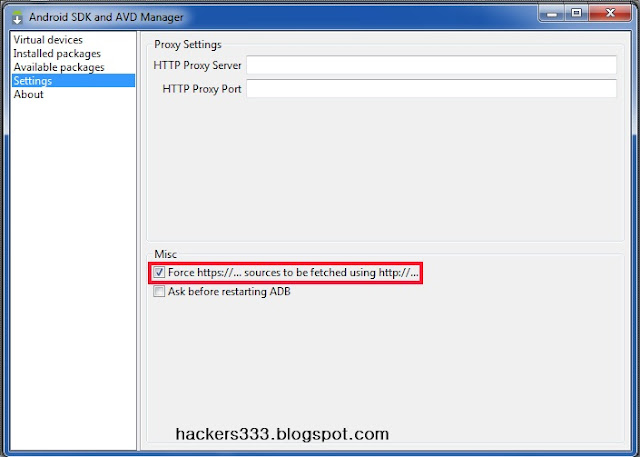
Packages Must Be Downloaded For Running Android OS on PC 


Note: If you see an SSL error message, click the Settings tab on the left in the SDK and AVD Manager window that opened in the background.  Here, uncheck the Force https box, click Ok, and then reopen the setup.


STEP 6: Now, the Package Installer will open. You can choose what you want to install, and then click Install to begin installing the Android emulator on your computer. I have chosen “Android SDK Tools, revision 11”, “Android SDK Platform-tools, revision 6”, “SDK Platform Android 2.2, API8, revision 3”

You can select whatever version of Android OS, here i have selected android 2.2 OS


Once you have select install, downloading and installation process will start automatically. Just wait for sometime. You’ll see a window showing the download and installation progress.  This may take a few minutes, depending on your Internet speed.


You can also Download The Packages Directly with IDM or any other Download manager or Browser, I will provide the Direct Download Links on request and How to use them


Setting Up Android Emulator

STEP 7: Once you have finished downloading required tools, you can setup the emulator to begun your test. Go to Virtual Devices > Click On New From the right hand panel. Enter a name for your virtualized Android, and select the version of Android you want to use from the drop-down menu.  This will only show the version you installed previously, so you may only see one version listed depending on your selection.


STEP 8 : Enter a size under the SD Card entry; this is a virtual SD card that’s actually an IMG file that Android will use to store your settings and files in.  Then, select a screen size from the skin options.  The default is a standard, Nexus One-type display, while the others are different sizes including even a BlackBerry-style device. Click Create AVD when you’re finished. See in Image above.

The program may appear to freeze while it is creating the AVD, so just wait until you see the confirmation window.

Starting The Android Emulator

There are 2 ways to Start The Emulator
1. By Clicking On Launch Directly(which sometimes doesn't works)
2. By Using command prompt (100% working method)

i will recommend you to use the Command prompt method

1. By Clicking On Launch Directly 

Select your created AVD (see image) and click Start on the right. You can choose to scale the display if you’ve chosen a larger screen size than your monitor will fit, and then select Launch.

Android will now begin to load in your emulator.  Several windows may open, and then you’ll see the emulator itself.  Notice that the default, large screen size will display a keypad and virtual buttons on the right side of the emulated device. Android may take several minutes to load, especially on your first run.  After a while, the boot screen will switch to an Android boot animation.(See Image Below) and you will be presented with Home screen.


2.By Using command prompt


Open your Android SDK folder and open the Tools folder.  Press the Shift key and right-click, and then select Open Command Window Here.


Now enter the following in the Command Prompt, substituting the name of your Android virtual machine for your_device:

    emulator.exe @YourDeviceName

Here i have created "hackers333" as device name so i have put "emulator.exe @hackers333" (see image below)

Note: Device name Should be same as which you had created in STEP 7:


Android will now begin to load in your emulator.  Several command prompt windows may open, and then you’ll see the emulator itself.  Notice that the default, large screen size will display a keypad and virtual buttons on the right side of the emulated device. Android may take several minutes to load, especially on your first run.  After a while, the boot screen will switch to an Android boot animation.(See Image Below) and you will be presented with Home screen.


Yu can use  Ctrl + F11 to switch the display in Landscape mode (see First Image which is in Landscape Mode)

You can use Its browser To surf the internet, You can also  Run the Android Apps In Emulator, i will soon Post the Trick To Install and Run The .APK apps In Android Apps 


Here Is the Screen Shot of My blog from Android Browser.

If you face any problems While Using Installing or Running Emulator, please comment here , i will surely Help you....